
(continued from Messaging Tips & Hints)
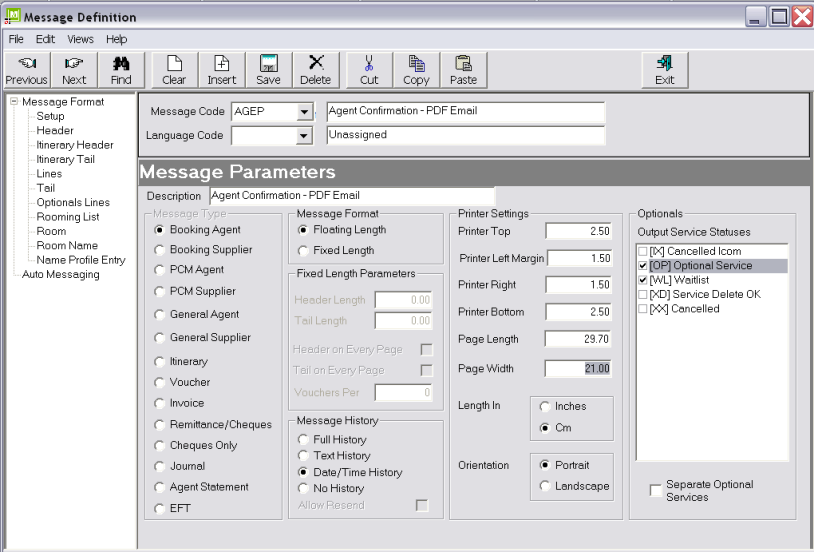
Screen Shot 196: Message Parameters Screen
This screen is divided into 5 main sections:
Message Type
Message Type (radio button)
Select the correct message type.
|
|
Once the message parameters screen has been saved, the message type cannot be changed. Similarly, when a message template is copied from another message template, the copy inherits the type of the source message template and cannot be changed. |
Message Format (radio button)
These fields control how page depth is to be handled. There are two options—Floating Length and Fixed Length.
At the time of message output, a Fixed Length message will feed to the end of the page. This means that if the page length was (e.g.) 29.70cm and the message only took up 20 cm, the remaining 9.70 cm of the page would be blank.
A Floating Length message has no blank area inserted between the end of the message and the end of the page.
If this field is set to Fixed Length, the Fixed Length parameters radio buttons become enabled.
For fax/email output, this field is normally set to Floating Length
If messages are being output onto pre-printed stationery, the field should be Fixed Page.
Header Length (Numeric 5, 2)
The length (in either centimetres or inches—see Printer Settings) of the message Header. The header section of a message is the upper portion that contains addressing information and detail that is specific to the booking overall—not service specific. The sample message in Example 5: Sample Message Output shows the Header section of that message.
|
|
The header section should be measured from the top of the header, not the top of the page. The distance between the top of the page and the top of the header is controlled by the Printer Top Margin setting (see Printer Settings). |
Tail Length (Numeric 5, 2)
The length (in either centimetres or inches—see Printer Settings) of the message Tail. The tail section of a message is the lower portion that contains pricing information and other detail that is specific to the booking overall—not service specific. The sample message in Example 5: Sample Message Output shows the Tail section of that message.
|
|
The tail section should be measured from the bottom of the tail, not the bottom of the page. The distance between the bottom of the page and the bottom of the tail is controlled by the Printer Bottom Margin setting (see Printer Settings). |
Header on Every Page (Checkbox)
If the Header is to be output on every page of a multi-page message, check this box.
Tail on Every Page (Checkbox)
If the Tail is to be output on every page of a multi-page message, check this box.
Vouchers Per Page (Integer 5)
If the message type is Voucher, this field will be enabled. Enter the number of vouchers to be printed to page.
|
|
Per Page in this context is the actual paper size, not the document size. It could be argued that one voucher is one page, regardless of the voucher size. This setting is designed to allow e.g., 3 vouchers to print per A4 sheet. |
Message history is set per message template and history can be stored in several ways.
Full History (radio button)
With this option checked, the message is retained in the exact format as it was sent, including any graphics. When Full History is selected, the Allow Resend checkbox is enabled. Message history can be viewed against the Booking/PCM that the message was sent from, or from the Agent (if it is an Agent message) or Suppliers (if a Supplier message).
Text History (radio button)
With this option checked, the message is retained in a text only format and any graphics that may have been part of the message are stripped out. Resending is not possible. Message history can be viewed against the Booking/PCM that the message was sent from, or from the Agent (if it is an Agent message) or Suppliers (if a Supplier message).
Date/Time History (radio button)
With this option checked, only the following detail is retained:
No History (radio button)
No record of any sort is retained of the message.
Allow Resend (Checkbox)
This checkbox is only enabled when Full History is selected, and when checked, messages are able to be re-sent from history. If unchecked, messages cannot be re-sent.
The major drawback to retaining message history is the huge volume of disk space consumed, particularly when Full History is retained and there are graphics in the message. Some points to consider.
If the messages that the template is for are predominantly going to be sent via email, then the email client (Outlook, etc.) will have a copy of the message stored in Sent Messages.
If it is essential for re-sending, then Full History will have to be turned on. But if history is required only for enquiry/audit purposes, then text-only history will probably suffice.
Printer Top Margin (Numeric 5, 2)
The space (in either centimetres or inches—see Length In) between the top of the page and where the first section of the message begins printing. If left blank, printer defaults will be used.
Printer Left Margin (Numeric 5, 2)
The space (in either centimetres or inches—see Length In) between the left hand side of the page and where the lines begin printing. If left blank, printer defaults will be used.
Printer Right Margin (Numeric 5, 2)
The space (in either centimetres or inches—see Length In) between the right hand side of the page and where the lines finish printing. If left blank, printer defaults will be used.
Printer Bottom Margin (Numeric 5, 2)
The space (in either centimetres or inches—see Length In) between the bottom of the page and where the last section of the message finishes printing. If left blank, printer defaults will be used.
Page Length (Numeric 5, 2)
The length (in either centimetres or inches—see Length In) of the paper being used.
Page Width (Numeric 5, 2)
The width (in either centimetres or inches—see Length In) of the paper being used.
Length In (radio button)
Check either Centimetres or Inches. This value applies to all dimensions in this parameters screen
Orientation (radio button)
Check either Landscape (horizontal) or Portrait (Vertical).
Those service statuses that have been set up with Include in Total set to N (see Service Status) display in the multi select list box.
The output of optional services detail in a message is controlled by selecting the service statuses that are to be output and then choosing whether those services are to be included in the main body of the message or be output in a separate message section. If they are to be output in a separate section, the Separate Optional Services checkbox must be checked.
Screen Shot 197: Sample Completed Message Parameters Screen
Save
Click the Save button in the button bar to continue to the Message Header.
|
|
The screens remaining to be completed are all basically blank sheets of paper which need text and substitution codes added to them, in the position and format required. Optionally, graphics, print enhancements etc. can be added. |
(continued in Editing Screen Basics)
 Tourplan iS V2.07 System Setup Training Guide
